Immediate rule
Five skills to master
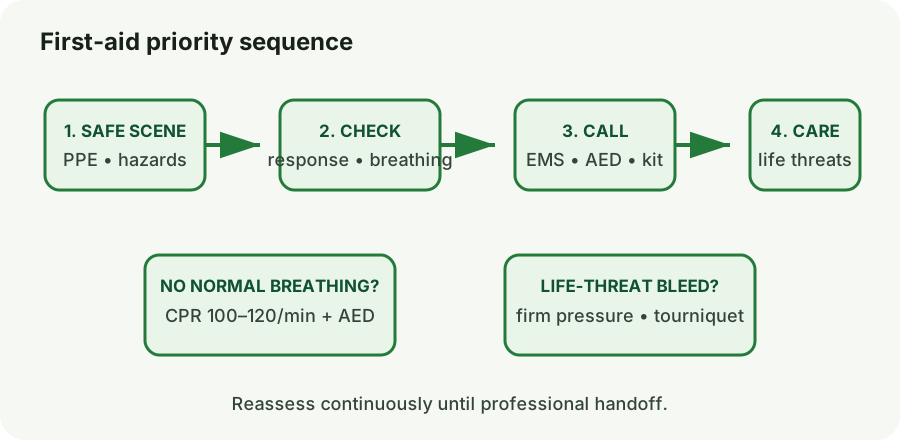
Learn these five competencies in order. Each section below gives a rule, a procedure, and the boundaries that prevent common mistakes.
Scene assessment and emergency call
- Check the scene. Look for traffic, fire, electricity, violence, unstable structures, chemicals, water, or other hazards. Use gloves or another barrier when available.
- Check the person. If they appear unresponsive, shout, tap the shoulder, and shout again. Check normal breathing and obvious life-threatening bleeding for no more than about 10 seconds.
- Call and delegate. Call the local emergency number or point to a specific bystander and tell them to call and bring an AED/first-aid kit.
- Give the highest-priority care first. Cardiac arrest and catastrophic bleeding are time-critical. Treat what you can without delaying the emergency call.
- Keep reassessing. Watch breathing, responsiveness, skin condition, and bleeding until professional help takes over.
Practical note
Do not move a person with possible head, neck, back, or major trauma unless the location itself is dangerous, movement is needed for CPR, or bleeding cannot otherwise be controlled.
Adult CPR and AED
- Position. Place the person on their back on a firm, flat surface. Kneel beside the chest.
- Compress. Put two hands in the center of the chest, shoulders over hands, elbows straight. Give compressions at 100–120 per minute, about 5 cm / 2 in deep, allowing full recoil.
- Breaths if trained and willing. After 30 compressions, give 2 breaths, each about 1 second and just enough to make the chest rise. If you are not trained or cannot give breaths, continue hands-only CPR.
- Use the AED. Turn it on, expose and dry the chest, attach pads as pictured, and follow the voice prompts. Make sure nobody is touching the person during rhythm analysis or shock delivery.
- Resume immediately. Continue CPR after a shock or “no shock advised” message. Stop only when the person shows clear signs of life, trained responders take over, the scene becomes unsafe, or you physically cannot continue.
Important limit
This is an adult lay-responder summary. Child and infant CPR, advanced airway care, and special circumstances require specific training; follow dispatcher/AED prompts and current certified training.
Severe bleeding control
- Find the source. Expose enough clothing to see where the blood is coming from.
- Press directly. Place gauze, a hemostatic dressing if available, or a clean cloth over the wound and press hard and continuously.
- Tourniquet for life-threatening limb bleeding. Place it about 5–7.5 cm / 2–3 in above the wound, not over a joint, and tighten until bleeding stops. Note the time.
- If bleeding continues. Fully tighten the first tourniquet. If the device instructions/training call for it, place a second tourniquet above the first.
- Do not undo successful control. Do not loosen a tourniquet in the field. Do not remove deeply embedded objects; stabilize them and press around them.
Important limit
Do not pack wounds of the chest or abdomen from a web guide. Wound packing is a trained technique for selected junctional wounds. Call emergency services for any life-threatening bleed.
Burn care
- Make the source safe. Remove the person from heat, extinguish burning clothing, and switch off electricity before touching an electrical casualty.
- Remove constricting items. Take off rings, watches, belts, and loose clothing near the burn before swelling develops; leave anything stuck to skin in place.
- Cool. Use clean, cool running water for roughly 5–20 minutes. For a chemical burn, brush off dry chemicals with protection first and flush liquid contamination; follow emergency/poison guidance.
- Cover loosely. Use a clean, dry, non-adherent dressing once cooling is complete. Keep the rest of the person warm.
- Escalate. Seek urgent medical care for deep or large burns, burns to face/hands/feet/joints/genitals, circumferential burns, electrical or chemical burns, inhalation injury, or burns with other serious trauma.
Important limit
Do not use ice, butter, oil, toothpaste, or adhesive dressings on a burn. Large-area cooling can cause hypothermia; monitor the whole person.
Fractures, shock, and monitoring
- Assume fracture when in doubt. Pain, swelling, deformity, loss of function, numbness, or abnormal position after trauma should be treated as a possible fracture.
- Do not straighten. Support the injured part in the position found. Do not push protruding bone back in.
- Use cold safely. For a closed injury, wrap a cold pack in cloth and apply for up to 20 minutes if tolerated.
- Recognize shock. Rapid weak pulse, rapid breathing, pale/gray/cool moist skin, confusion, restlessness, nausea, or extreme thirst are warning signs.
- Support until handoff. Call emergency services, treat the cause you can address, keep the person from becoming cold or overheated, and do not give food or drink to a person in shock.
Practical note
If there is no suspected trauma and breathing is comfortable, a person in shock may lie flat with feet slightly raised. If breathing is difficult, vomiting is likely, or trauma is suspected, use the position that best protects the airway and avoids worsening injury.
Practice before an emergency
- Take an accredited first-aid/CPR/AED course and refresh it on schedule.
- Locate AEDs in places you routinely use.
- Practice opening your first-aid kit and applying its commercial tourniquet to a training limb—not to a real person.
- Save local emergency and poison-control numbers offline.
- Replace expired or opened supplies after use.
Use guides as references, not substitutes for training
Conditions, local law, official emergency instructions, product instructions, and hands-on training can change what is appropriate. When an emergency service or responsible authority gives you a specific instruction for the active incident, follow it.
- American Red Cross — First Aid Steps
- American Red Cross — CPR Steps
- American Red Cross — Life-Threatening External Bleeding
- American Red Cross — Burns
- American Red Cross — Fractures
- American Red Cross — Shock
Source links are included so the guide can be checked against current official guidance. Review dates and local instructions before high-risk travel or seasonal hazards.