Immediate rule
Choose a safe site before choosing a shelter design. Get out of wind/rain/sun, insulate from the ground, keep bedding dry, and build the simplest shelter you can finish before conditions worsen.
Five skills to master
Learn these five competencies in order. Each section below gives a rule, a procedure, and the boundaries that prevent common mistakes.
Safe site selection
Rule: A perfect shelter in a hazardous site is still a bad shelter. Eliminate falling, flooding, sliding, fire, and traffic hazards first.
- Look up. Avoid dead branches, unstable trees, rockfall, ice fall, power lines, and structures that can shed material.
- Look down. Avoid dry streambeds, drainage channels, tide zones, depressions that collect cold air/water, unstable snow, and insect nests.
- Look around. Stay clear of avalanche/runout paths, cliffs, road edges, animal trails, fire spread, and isolated lightning exposure.
- Use natural protection. Prefer slightly elevated, well-drained ground with a windbreak that cannot fall on you.
- Keep exit options. You should be able to leave the shelter quickly if water rises, wind changes, fire spreads, or the structure fails.
Ground insulation and moisture control
Rule: Insulation below the body is as important as cover above it because conductive heat loss to cold/wet ground can be rapid.
- Start with a dry barrier. Use a sleeping pad, folded tarp, pack, spare clothing, or dry plant material.
- Build thickness. Loose natural insulation compresses under body weight, so make the bed much thicker than it looks necessary before lying down.
- Protect dry layers. Keep sleeping gear and spare clothes inside waterproof bags until the roof is ready.
- Manage condensation. Ventilate rather than sealing a shelter airtight. Avoid breathing directly into insulated sleeping gear.
- Change wet layers. If dry clothing exists, put it on after the shelter is protected, not while standing exposed in rain or wind.
Tarp and bivvy shelter geometry
Rule: Use roof slope and tension to make water move away from the sleeping area; do not create a flat water-catching roof.
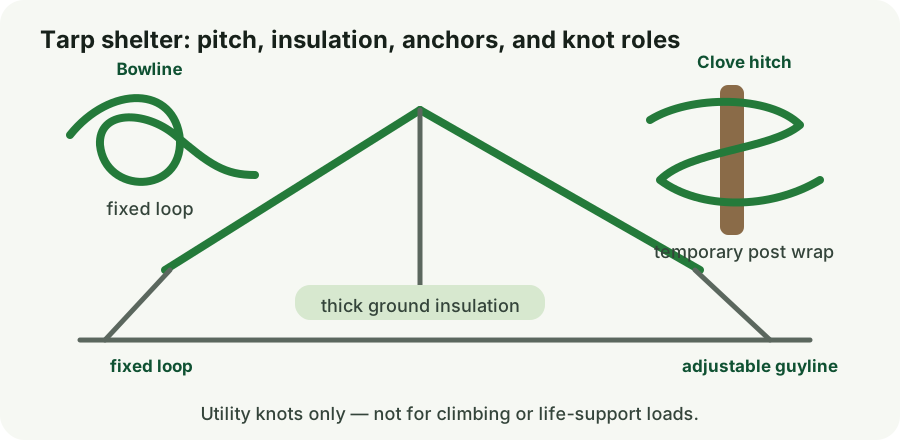
- A-frame: run a ridgeline between two secure anchors, drape the tarp over it, and stake both sides low. Best all-around choice for rain and moderate wind.
- Lean-to: secure one long edge high and the opposite edge low. Fast and open, but orient the low/back side toward wind and rain.
- Low storm pitch: keep the roof low and anchor points strong when wind is the main problem. Reduce unsupported fabric.
- Bivvy/emergency blanket: use immediately when time, darkness, injury, or lack of cordage makes construction unrealistic.
- Drain away, not through. Choose natural drainage first. Do not dig trenches that damage protected ground unless necessary and permitted.
Knots, guylines, and anchors
Rule: Use simple knots for one job each: a fixed loop at an anchor, an adjustable hitch for guyline tension, and a clove hitch for a temporary wrap around a post.
- Bowline — fixed loop. Make a small loop in the standing part; pass the working end up through the loop, around the standing part, then back down through the original loop. Dress firmly and leave a generous tail.
- Taut-line hitch — adjustable guyline. Wrap the working end around the anchor, then make two wraps around the standing line inside the loop and one wrap outside; tuck through, dress, and slide only when unloaded.
- Clove hitch — quick post attachment. Wrap around the post, cross over the standing part, wrap again, then tuck the working end under the crossing turn. Dress and back it up if the load varies.
- Anchor low and in line with the load. Stakes hold best when the guyline pulls across them rather than straight upward.
- Test every anchor. Load each line by hand before trusting it. Re-tension after wetting, wind shifts, or temperature changes.
Important limit
These knots are presented for tarp and camp utility, not climbing, rescue, rappelling, or life-support loads. Critical rope systems require appropriate rated equipment and training.
Natural shelters and weather management
Rule: Build a natural shelter only when manufactured cover is unavailable and you have enough time, energy, and dry material to finish it before exposure worsens.
- Keep it small. A body-sized debris shelter takes less material and retains warmth better than a large hut.
- Build a stable frame. Use a ridge and ribs that cannot roll or collapse inward.
- Add deep insulation. Pile dry leaves, grasses, or similar loose material over the frame and inside as bedding.
- Leave ventilation. Do not make the structure airtight, and never run a stove or open flame in an enclosed improvised shelter.
- Improve after survival needs are met. Once dry and insulated, add visibility/signaling and weather reinforcement rather than enlarging the shelter.
Practice before an emergency
- Pitch an A-frame tarp in daylight, then repeat using gloves.
- Tie the bowline, taut-line hitch, and clove hitch until you can identify and inspect each finished knot.
- Test stakes in soft soil, hard soil, and with deadman anchors using bags/rocks where legal.
- Build a dry sleeping platform without cutting live vegetation.
- Time yourself: shelter should become weatherproof before you spend effort making it comfortable.
Use guides as references, not substitutes for training
Conditions, local law, official emergency instructions, product instructions, and hands-on training can change what is appropriate. When an emergency service or responsible authority gives you a specific instruction for the active incident, follow it.
Reference sources:
Source links are included so the guide can be checked against current official guidance. Review dates and local instructions before high-risk travel or seasonal hazards.